The Adventure Script Editor
This document will explain how to use the Adventure Script Editor.
Overview
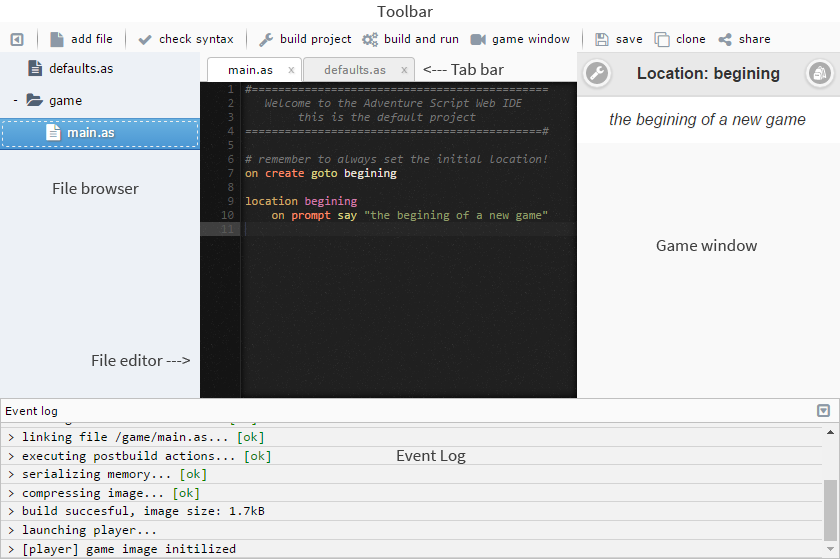
The Adventure Script Editor (shown above) consists of the following areas:
- The toolbar
- The tab bar
- The file browser
- The game window
- The file editor
- And the event log
All of these elements will be described shortly below.
File browser
The file browser simply shows you a list of files and folders inside your project. Folders can be collapsed by double clicking them or clicking the - symbol on their left. Double clicking a file will open it in the file editor placing it’s tab in the tab bar. Double clicking a file with a tab already in the tab bar will simply switch to it’s tab. Right clicking a file or folder will open it’s context menu which will allow to rename, delete or move it up / down the selected element in the file browser. Files and folders can be added from the toolbar. The file browser can be shown or hidden by clicking the leftmost button on the toolbar.
Tab bar
The tab bar simply works like a tab bar in a web browser or any other application using tabs. Closing a tab does not remove the file associated with it – to remove a file use the context menu of the file browser. Tabs can be opened by double clicking files in the file browser. Closing all tabs will hide the tab bar and the file editor.
File editor
The file editor displays and allows editing of the file associated with the active tab from the tab bar.
Event log
The event log displays important information like errors. The event log can be shown or hidden by clicking the button on the right of it’s top.
Game window
The game window contains the Adventure Script Player in which the project will be executed once the build and run button is clicked on the toolbar. The game window can be shown or hidden by clicking the game window button on the toolbar.
Toolbar
The toolbar consists of the following buttons (form left to right):
toggle the file browser
This button is the only button without text. It simply hides or shows the file browser
add file
This button is used to add files and folders into the project. Once clicked a prompt asking for the file name will appear. The name can be a path (for example /path/to/file.as). Folders listed in the path will be automatically created and added to the project.
check syntax
This button checks the syntax (if there are no obvious mistakes) of the file currently opened in the file editor. The result is displayed in the event log. When a problem is found, the cursor will automatically jump to it’s location. This button is disabled when the file editor is hidden.
Example result when no errors are found:
> compiling file /game/main.as... [ok]
Example result when errors are found:
> compiling file /game/main.as... [failed]
> Parse error on line 7:
on 42 create goto begin
---^
Expecting 'VARNAME', 'COMBINE', got 'NUMBER'
build project
This button builds the project into a game image. The results of the build process are displayed in the event log. To execute the project in the game window use the build and run button.
Example of a successful build:
> compiling file /defaults.as... [ok]
> compiling file /game/main.as... [ok]
> linking file /defaults.as... [ok]
> linking file /game/main.as... [ok]
> executing postbuild actions... [ok]
> serializing memory... [ok]
> compressing image... [ok]
> build succesful, image size: 1.7kB
Example of a failed build:
> compiling file /defaults.as... [ok]
> compiling file /game/main.as... [ok]
> linking file /defaults.as... [ok]
> linking file /game/main.as... [failed]
> RUNTIME_ERROR: unknown event creat
stack trace:
[2] /runtime/game.as:rret:67
[1] /game/main.as:root:7
build and run
This button preforms the same actions as the build button, but also executes the game in the game window. The game will be executed only, if the build succeeds. On execution the game window is automatically opened if hidden.
game window
This button simply shows or hides the game window.
save
This button saves the project on the server. When saving a project for the first time a “I’m no a robot” form will appear. This button is hidden when we open a project without an access-key.
clone
This button creates a copy of the current project and opens it in a new window. This button is hidden if the project has never been saved.
share
This button displays four links in the event log that we can use to share our project:
- The play link opens our project in the Adventure Script Player. Keep a mind that a project needs to be build and saved for this link to work.
- The download link downloads our project as a standalone game file that allows offline playing without access to this website. As with the play link, the project needs to be build and saved. When giving a link to your game to others, please use the play link.
- The view project link opens your project in the editor but in read-only mode. The project can not be modified but can be cloned.
- The edit project link (aka access link) opens your project in the editor. Anyone with it can gain full access to your project. Write this link down and keep it a secret.
Example event log output:
> access links:
play game     http://as.badgerland.eu/0/play
download game http://as.badgerland.eu/0/download
view project  http://as.badgerland.eu/0/edit
edit project  http://as.badgerland.eu/0/edit/00000000000000000000000000000000
The share button is hidden until we save the project for the first time, or when we open it in read-only mode.
Saving your project
Projects are saved on the server. There is no automatic saving, to save a project you need to click the save button on the toolbar and have an active internet connection. So always remember to save before closing! To access your project later on you have to write down the access link. Copy it form your browsers location bar or click share on the toolbar and take it from the event log. It is also displayed in the event log when saving a project for the first time:
> registering project... [ok]
> registered under http://as.badgerland.eu/0/edit/00000000000000000000000000000000
> saving project...  [ok]